Part 8 – Documentation, the Necessary Evil
Love it or hate it, I’ve already decided documentation is required so you are stuck with it. Code comments and docstrings aside, part of the planned documentation is this series of blog posts (so I can remember what I did basically). Hopefully these demystifying some of the mysteries behind the general methods involved.
For the remainder I’ll leave it up to a readthedocs page to explain the ins and outs for the end user. If you are not familar with readthedocs or RTD for short, it’s basically a free service for hosting documentation for public open source projects. You can link it directly to your Github repo, changing any of the documentation committed within Github, and you’ll automatically trigger an update of the RTD documentation pages.

I first came across RTD when reading up and throwing some numbers around on some other open source structural packages. I remember thinking it must have taken ages for the author to write all this nicely formatted documentation. Little did I know by combining RTD and a Python package called Sphinx, a large portion of the documentation of your code can effectively write itself.
What you say, write itself!? Well maybe not write itself, creating itself is perhaps more correct, you still have to actually write something. But it will automatically process your docstrings to fully document classes/functions etc. You can also write individual pages in ReStructuredText (ReST), LaTeX, Markdown or even html. You can even include snippets of formatted text within docstrings, to further document your code within the code with examples, images, etc.
It all gets processed and formatted in a consistent way, provided you write your documentation in a consistent way that can be interpreted by Sphinx to build your documentation. The fact that you can use Markdown, means if you already have comprehensive README.md files written in Markdown on Github, you can simply use it directly (pretty much like it wrote itself).
![\overline{x}= \frac{\displaystyle{\int_{y_1}^{y_2}}\; \bigg[\frac{(x_1-x_2)(y_2-y)}{(y_2-y_1)}+x_2 \bigg]\;\bigg[(1-(1- \displaystyle{\frac{y}{k_1c}})^n \bigg]\; \bigg[ \frac{(x_{b\,mid}-x_{t\,mid})(y_2-y)}{(y_2-y_1)}+x_{t\,mid} \bigg]\; \bigg[dy \bigg]}{ \displaystyle{\int_{y_1}^{y_2}}\; \bigg[\frac{(x_1-x_2)(y_2-y)}{(y_2-y_1)}+x_2 \bigg]\; \bigg[(1-(1- \displaystyle{ \frac{y}{k_1c}})^n \bigg]\; \bigg[dy \bigg]}](https://engineervsheep.com/wp-content/ql-cache/quicklatex.com-c53a59c21a3b05650b94e7fdb9bd0028_l3.png "Rendered by QuickLaTeX.com")
Looks like the following in LaTex… one character out of place and it goes pear shaped!
% LaTeX is fun they told me...

\overline{x}= \frac{ \displaystyle{ \int_{y_1}^{y_2}}\; \bigg[ \frac{(x_1-x_2)(y_2-y)} {(y_2-y_1)}+x_2 \bigg]\; \bigg[(1-(1- \displaystyle{ \frac{y}{k_1c}})^n \bigg]\; \bigg[ \frac{(x_{b\,mid}-x_{t\,mid})(y_2-y)} {(y_2-y_1)}+x_{t\,mid} \bigg]\; \bigg[dy \bigg]}{ \displaystyle{ \int_{y_1}^{y_2}}\; \bigg[ \frac{(x_1-x_2)(y_2-y)} {(y_2-y_1)}+x_2 \bigg]\; \bigg[(1-(1- \displaystyle{ \frac{y}{k_1c}})^n \bigg]\; \bigg[dy \bigg]}
Starting out as a ReST and LaTeX virgin, it’s pretty easy to break things as the formatting needs to be structured in a certain way (see above example). Of course there are multiple ways to achieve the same end result sometimes, Googles going to come in handy here. But overall it seems a lot less forgiving than Markdown. The mathematical expressions used in earlier posts in this series were created with LaTeX for example, and if you miss a bracket all hell breaks loose. Practice makes perfect, plenty of guides out there on the internet relating to creating documentation in ReST or LaTeX, so just find one that works for you.
By default Sphinx will process docstrings written in the Sphinx style, the napoleon extension extends this to include numpy and Google styles if that’s your thing. Combine this with extensions (such as autoDocstring for VS Code) to generate the basis of the docstring in the first place and it takes some of the guess work out of it.
RTD has some pretty good example/sample documentation pages that helped with the various types of formatting available. But even if the documents build locally its no guarantee it will automatically built remotely. I had some weirdness going on relating to the intentional errors in the samples that RTD provides. These examples built locally, but not remotely, I swear computers hate me sometimes. Well I sorted it out eventually by stripping out the intentional errors. It took a fair few hours (probably days) of reading and watching tutorials to get the basics of RTD, ReST and LaTeX under control.
But never fear, to help me in the process, especially if I end up using RTD for other projects in the future I took the opportunity to setup a template that could be used again. Given sufficient time, it’s going to be pretty easy to forget all the know how to initially set it all up.
I therefore created a Sphinx RTD template that includes all the basic configuration and includes some extensions that ended up proving useful. Basically to setup in a new repository its as simple as copying a folder to your repository and installing some prerequisite packages, and then linking Github and RTD together.
In the template I got carried away and ended up changing the default theme a bit using css to suit my needs. Didn’t really know any html or css before starting, so surprisingly the end result works!

By default I found the width to narrow, and some of the font sizes seem a bit inconsistent compared with the general font size used for normal text. Of course I needed to add my favourite mono spaced font as well, Inconsolta for the win! I tried out some fancy alternatives with ligatures for a while, but I just couldn’t wrap my head around the visual changes.

Once you’ve got dual 4k screens most things look narrow. But even if most people have at least a 1080p monitor these days the 800 pixel width inflicted upon you by default is pretty narrow. Dear Internet it’s not 1999 anymore…
Part of the reason for making it wider is so my coding style of slightly longer (you know nearly double) than default number of characters of code per line in Python actually fits within a code block.
I basically threw PEP8 styling guide out the door in terms of line length. Sorry Python purists, but I find 80 character limit you guys are peddling pretty limiting. I actually find it less readable once longer lines start wrapping to the following line. At 150 characters it works better for me, but it’s up to you, I’m not going to judge you too much on this life choice if you’re a die hard fan of sticking to 80 characters.
For anyone that’s interested, I use the black code formatter in VS Code. With the exception of using single quotes (again personal preference) and the longer lines, black basically sticks hard and fast to the PEP8 standard. These are pretty much the only two things black code formatter let’s you configure to be fair, it promotes itself as ‘the uncompromising code formatter’ for a reason.
In VS Code you can set the following parameters in settings.json to achieve the same style I work with:-
"python.formatting.provider": "black",
"python.formatting.blackArgs": [
   "--line-length=150",
   "--skip-string-normalization",
],
Setting up the template
So assuming you just want to use something that works, as opposed to spending days familiarising yourself with the inner workings of setting things up from scratch, then lets go through how to setup the template:-
Step 1 – install prerequisites
Install the following prerequisites:-
- sphinx
- cloud_sptheme
- sphinx_rtd_theme
- Pygments
You can find links to these packages on the RTD page for the template.
I’ve never tested it, but presumably you could get away with not installing any of these packages locally if you only planned on building your docs remotely from Github and were the kind of person who never makes mistakes.
But since we will want to actually check the documentation locally to make sure its error free before committing it, and not cause a whole lot of unnecessary commits correcting our errors, its best to install them all.
In the package there is a requirements.txt file, when building remotely this information is used by RTD to setup a virtual environment for undertaking the remote build.
Step 2 – download repository
Download or clone the template repository.
Copy the entire \docs directory to the root directory of the local copy of the Github repository that you want to add documentation for.
Step 3 – setup configuration
To get Sphinx to automatically process any docstrings within python modules, you need to tell it where to find these modules.
Modify in the conf.py module located in \docs\source directory the following line(s) to the path(s) where modules are stored relative to the conf.py file.
# add paths relative to this conf.py file to directories that include files to be processed &
# added to documentation based on docstrings within modules
sys.path.insert(0, os.path.abspath('../../'))  # root directory of repository
sys.path.insert(0, os.path.abspath('../../docs/source/_demo/_test_module'))  # path for demo test.py file
By default this goes up to the root, and there is also a path to some demo/example files, you can delete this if its not required. Add a separate entry for every directory you want processed.
Update the default project information as required with details of your own project:-
# -- Project information -----------------------------------------------------

project = 'Sphinx RTD Theme Template'
copyright = '2019, Agent666'
author = 'Agent666'

# The short X.Y version
version = '1.000'
# The full version, including alpha/beta/rc tags
release = '1.000'
The rest can pretty much get left at the defaults, but you can read more about what each option does within the Sphinx documentation.
You need to also specifically instruct Sphinx which additional pages to process for your documentation, and what order to create your contents pane, if you take a look in the index.rst file within the \docs\source directory you’ll find the following examples:-
.. toctree::
    :maxdepth: 2
    :numbered:
    :caption: Demo Documents

    _demo/structure
    _demo/demo
    _demo/lists_tables
    _demo/api
This essentially directs Sphinx to process these particular files and results in the following table of contents which is generated from headings in the processed files:-

If you want to rename the entry in the contents to something different to the file name, then you use the following format (note you can replace _demo directory with where ever you have your documentation files stored):-
.. toctree::
    :maxdepth: 2
    :caption: Demo Documents

    Some different title <_demo/structure>
    A demo title <_demo/demo>
    I'm running out of names for titles <_demo/lists_tables>
    _demo/api
The :maxdepth: argument can create further expandable sublists based on the heading level used for headings in your documentation.
Note how the demo test.py module we directed Sphinx to process from the ../../docs/source/_demo/_test_module directory has also turned up via the api.rst entry, which in turn has the lines at the top to enable this processing of the test.py module via the .. automodule:: line, there are ways of getting your code into the documentation, best to check here and choose something that works for you:-
*********************
:mod:`test_py_module`
*********************

.. contents:: Table of Contents

.. automodule:: test
    :members:
    :private-members:
    :special-members:
So for each class/module/function you want automatically documented/processed, you need the directory in which its located in the conf.py file, and a reference to the actual procedure in your documentation in the location where you want it added.
As you can appreciate there are many options, so if you want to know more have a read of the Sphinx documentation.
Step 4 – build some docs!
We’re at the sharp end now. Assuming you’ve written some documentation, then to build your documents locally by opening a command window in the /docs directory for your repository and enter make html.
Something similar to the following should be output, it may take a few minutes depending on the amount of files being processed:-
z:\Dropbox\00 -- Templates\01 -- Code Dev\Sphinx RTD Template\docs>make html
Running Sphinx v2.1.2
making output directory... done
building [mo]: targets for 0 po files that are out of date
building [html]: targets for 6 source files that are out of date
updating environment: 6 added, 0 changed, 0 removed
reading sources... [100%] index
looking for now-outdated files... none found
pickling environment... done
checking consistency... done
preparing documents... done
writing output... [100%] index
generating indices... genindex py-modindex
highlighting module code... [100%] test

copying images... [100%] _images/Comparison.png
copying downloadable files... [100%] _demo/_demo/lines.jpg
copying static files... done
copying extra files... done
dumping search index in English (code: en) ... done
dumping object inventory... done
build succeeded.

The HTML pages are in build\html.

z:\Dropbox\00 -- Templates\01 -- Code Dev\Sphinx RTD Template\docs>
Any serious errors will turn up in red text, with some (sometimes not so) helpful suggestions on what potentially went wrong. Run off and address these, and run make html again until you are error free. There may be some other warning type text from time to time, but if it builds you should be fine.
If you change any of the configuration, css or Python files, then to pick them up in the build process you may need to run make clean to flush out the _build directory, followed by make html again.
If it runs successfully, then you are the proud owner of some built html files which are located in the _build directory. Open them in your web browser to check them out.
Step 5 – create a RTD account, link to your Github account & build settings
Create an account on RTD, and activate/login to your account.
From the settings menu you can link RTD to your Github account:-

After linking your account you should be able to import a project:-

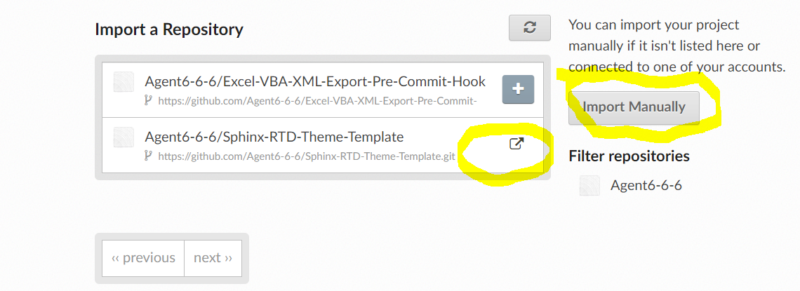
You should then see a list of your public repositories, select and add the one you creased the documentation for either by using the big plus, or manually via a URL:-
Now if you navigate to your newly created project, theres a few settings we need to setup under the Admin tab to get the build process going:-

Under settings fill out some basic information about your project, I’m pretty sure you can just leave all this blank as its all just FYI stuff.
Under Advanced settings, the important bits as far as getting it working remotely is the paths to the conf.py and requirements.txt files and the Python version.
I’m dumb, it literally took me 27 failed builds to even figure out these settings existed and needed to be filled out, you’d think with access to the repository it could possibly find them automatically or some guide on the internet would mention it ….. so they are apparently important to fill out with the correct paths to get it working. Engineer 0 v Sheep 1.
That’s it basically, you’re done apart from testing it works.
Step 6 – test it!
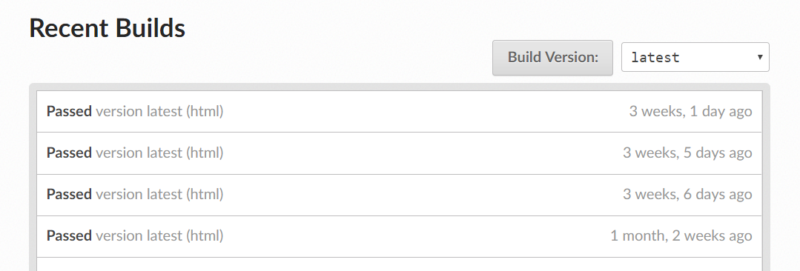
To test the setup is working commit your documentation to your repository, or a change to your documentation to Github. This should trigger a remote build to incorporate the changes which you can then check at your RTD URL.
Examples
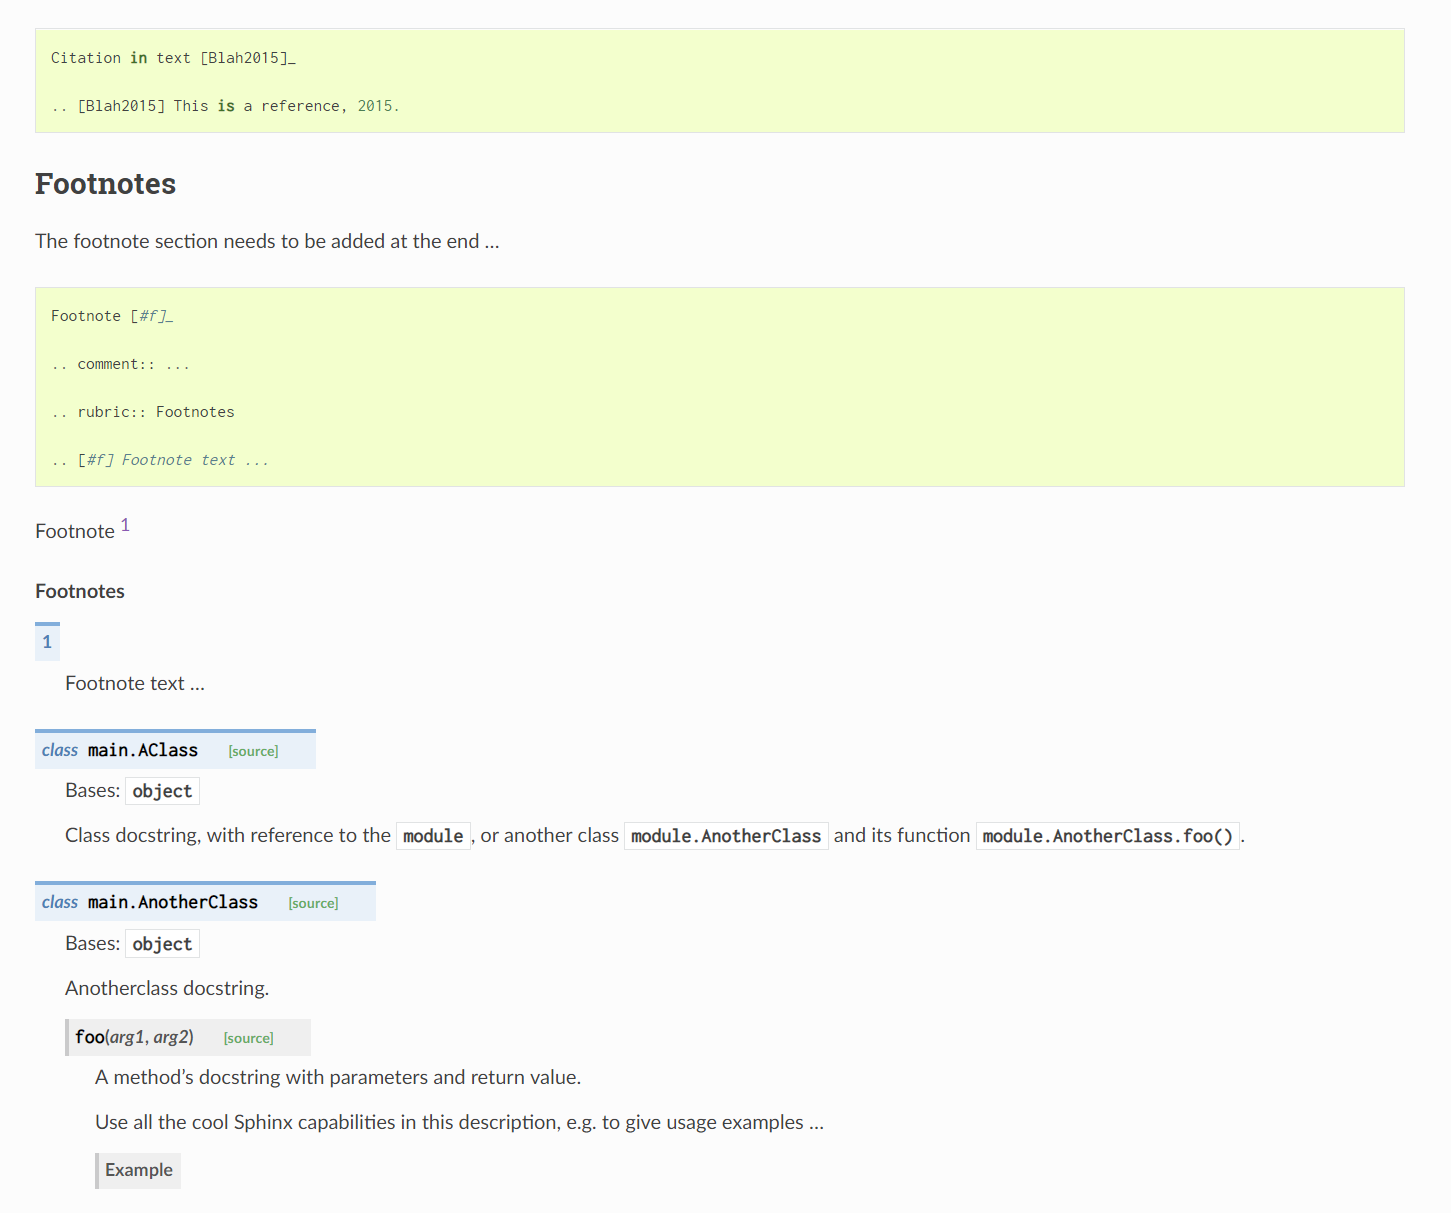
Review the demo files under _demo directory for examples of formatting, etc. This directory can be removed, and references to it removed from index.rst file. Note the provided example content is taken from the official RTD pages, and due to the wider default page width, and the use of the Sphinx RTD Theme some of the formatting may look different (for example footnotes, and some of the examples of text wrapping around images).
Conclusion
Hopefully by using the template I’ve saved you some time or helped in some way to avoid the shame of 27 build failures in a row, which reminds me of this little gem:-
The definition of insanity, is, doing the exact same fucking thing over and over again, expecting shit to change
In my defence, I wasn’t always doing the exact same thing every time, I was trying everything, but the end result was the same. Let’s settle on half insane…
Has there been any progress on Parabolas, Rectangles, Triangles & Snakes?
I’ve made a little more progress, but also came up against a few issues relating to the way I was sorting coordinates in Python and a slight loss of accuracy (for some reason when sorting, the before and after numbers was changing ever so slightly which caused issues with matching with that number). Definitely need to get back onto this!