In my previous post I commented on how Bluebeam could be made a ‘little‘ bit more useful. It wouldn’t be that hard for the developers … surely.
However, if you know a little JavaScript and are motivated enough you can make some mark-up tools that are just a little bit smarter.
I don’t really know JavaScript, nor am I that motivated to fully learn it either, but I managed to cobble something together based on some googling and some perseverance. I never managed to find that much useful information on JavaScript and PDF’s, seems to be something that just isn’t discussed in great detail.
If you didn’t know, one thing about PDF’s that is quite cool is that you can embed JavaScript code within form elements to do some magic in your documents. One area where this proves useful as an Engineer is in the use of stamps in Bluebeam.
Bluebeam themselves produce a few examples of submittal stamps that include some JavaScript smarts behind the scenes. You can find these on the Bluebeam website to review how the form elements interact with the JavaScript code.
For example, when you place a stamp you can have some dynamic fields on the stamp update as the result a calculation and/or prompt user for some input. With some imagination you can create something quite useful that has potential to make you a little more efficient.
What I’ll attempt to show you here is some simple tricks to make some of these smarter tools. Presumably if you are fluent in JavaScript this will open up some further possibilities to you.
I basically have zero JavaScript knowledge, it’s not really my thing, but it works usually by virtue of perseverance and brute force trying various bits and pieces of code.
Coming from a VBA/Python background I find JavaScript’s nomenclature quite confusing, and Bluebeam’s editor offers no formatting/linting features (it’s just a dumb text editor).
But I can kind of follow along in terms of the logic being used in JavaScript (as I’m sure you will be able), so it’s entirely possible to cobble together something with a bit of experimentation & logical.
So, let’s start with something simple…
How do we embed JavaScript in a PDF within Bluebeam?
Well for a start, you must have the Extreme version of Bluebeam. As far as I am aware this is the only version that allows you to access the form editing features. If you have the Standard or CAD versions, you’re out of luck unfortunately. However, you can do the same in Adobe as well as probably any other full featured PDF editor.
To access the editor functions you need to enable the forms Toolbar. Or access it through the Tools menu in the title bar.

This allows you to add form elements like textbox’s, radio buttons, check box’s and the like to a PDF. It’s within the settings for these form elements that you can start to embed JavaScript under the Calculations section if you select for example to add custom calculation.
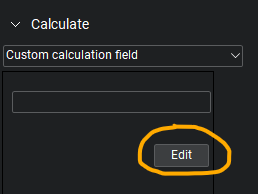
Clicking on Edit opens the Bluebeam JavaScript editor…

Paste any JavaScript code here basically.
Let’s do some examples to demonstrate what might be possible.
Example 1 – A Fillet Weld symbol that prompts the user for a size when placed
This one is a stamp that prompts the user for the weld size and populates a text field in the stamp with that leg size. Saves a little bit of time when marking up drawings I guess and makes an otherwise simple dumb stamp dynamic.
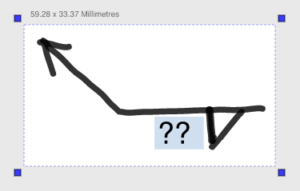
Create a new PDF and draw your weld symbol, freehand or using the mark-up tools. Once you’ve completed your masterpiece, save you new stamp in Bluebeam’s stamp folder.
If you now open your stamp through the stamps menu to edit it further. You will note that there are some handles at the edge of the PDF sheet that can be dragged around to set the view extent. Adjust these until they closely encompass your fillet weld mark-up like shown below: –

Now add a textbox in the correct location for the weld size. Select this textbox and add the following code in the JavaScript editor under Settings>Calculate>Custom calculation field.
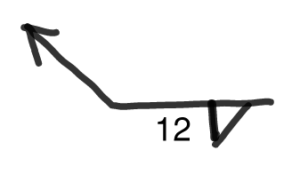
event.value = app.response("FW Size")This essentially means once the mark-up is placed it will create and event that prompt for a fillet weld size, the text entered at this prompt populates the textbox that you added the JavaScript code to. Your stamp should now look like below, adjust the formatting if required. Save and close the stamp.
Then use the stamp in a PDF and you’ll be prompted for the fillet weld size: –

Your stamp should appear with whatever leg size you entered in the textbox. Champion.
Conclusion
You’ve created your first dynamic stamp. Engineer 1, Sheep 0!
Stay tuned for something a bit more complicated.
This is pretty cool stuff man. I found a way to run Bluebeam scripts straight out of Excel VBA (since that’s all I know how to program). You can sent script commands right to the ScriptEngine.
Here is the sub that executes the script:
Sub RunRevuScript(RevuScript As String)
Dim RevuPath As String
Dim command As String
RevuPath = “C:\Program Files\Bluebeam Software\Bluebeam Revu\20\Revu\ScriptEngine.exe”
command = RevuPath & ” ” & RevuScript
Shell command, vbNormalFocus
End Sub
https://github.com/markbrauning/BlueBeam-eX-Excel-Submittal-from-Folder-Structure
I’m sure there is a better way but this is what I could scrape together
Hi Mark
Interesting concept. Will definitely try have a play around to see what might be capable when I get some free time. Works been full on for quite a while and haven’t been able to put the time into the blog that I want to!
Hello
Thanks for sharing the code, but how can I make the stamp ask the fillet size weld every time I use the stamp?
I believe it only does this on older versions of Bluebeam. On the latest version (version 21) it prompts every time for me.
I would like to see the weld symbol stamp activate the line editor for arrow placement.
1. Place weld stamp.
2. Line editor opens and tip of arrow is selected.
3. Arrow placed at desired location. Arrow line length will automatically increase/decrease length accordingly.
4. LeftClick anywhere or press Tab/Enter to complete.
Hi Linn
You cannot achieve anything like that with a stamp, the linework is not dynamic at all after placement.
However if you were to create a similar grouped element and store as a tool in the tool chest, then when you place it from the tool chest you can in fact alt-click the grouped element and select the individual arrow and adjust the location. You’d do the same to alter any text (such as the weld size). You’d have to create a left and a right version to cover both orientations.
Now if only we could use a Script to embed custom calculations into a form field without navigating through properties, i.e., we have forms we use year to year, but when we do an update to the base template we have to transfer that data, some markups, and custom calculations to the new form. interacting with each form field to re-create these calculations is cumbersome and time consuming. Not to mention not everyone int he department has the same level of comfort when dealing with these.
Yeah I agree, a lot more could potentially be done to make things more user friendly and to expand on the capabilities.