Onto explaining the user defined functions, if you have no idea what I’m talking about go see Part 1.
Firstly a bit of background, in New Zealand we have the following hooks which we term ‘standard hooks’, because they are standard sizes/dimensions (obviously):-
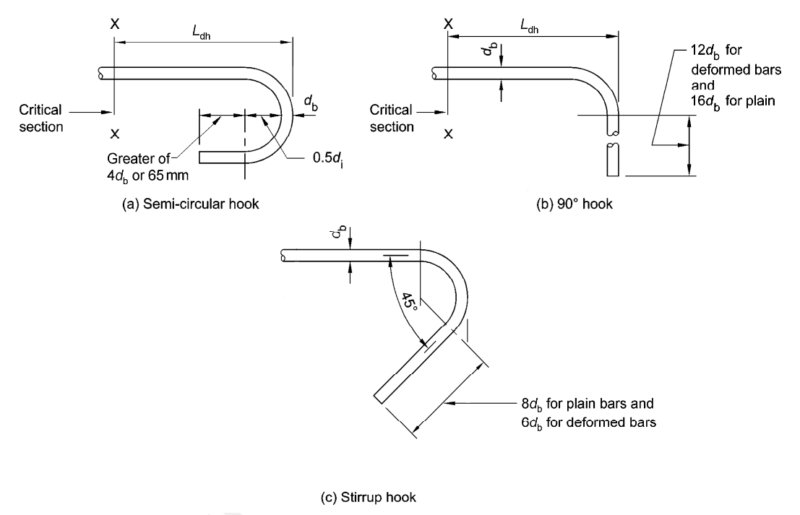
Bend diameters are also discretised into different values for main bars and stirrups or ties, with main bars requiring larger bend diameters in recognition of the potential of higher bearing stresses occurring between the bars and concrete on the inner edge of the bend. Similarly, deformed bars have larger bend diameter requirements than plain round bars in recognition of the additional strain hardening that occurs at the deformations when bars are bent.
Unlike other codes, we don’t really allow 90-degree hooks on the anchorages of our links or stirrups. This is because they basically perform like rubbish when compared to 135-degree hooks anchored into the core concrete, especially so once the cover concrete has fallen off curtesy of a friendly earthquake. If your code allows this, shame on you, go read some research on it ASAP and make up your own mind.
I will point out here that New Zealand codes seem to take a much more robust/stricter approach to the confinement of concrete, antibuckling and shear capacity when compared to some other international codes. You may call it conservative, but its my normal and to me your dinky 90-degree hooks in the cover concrete and wider spaced stirrup sets seem fundamentally wrong. It’s all about perspective I guess.
Let’s look at the user defined functions:-
generate_link UDF
This function generates coordinates for a link with 135 or 180 standard hooks. Basically some of these: –

The coordinates for the centreline of these two links are generated from the following formulas entered in cells. Two dynamic arrays are returned as shown below: –
=generate_link(300, 12, 25, 135, TRUE, TRUE, FALSE, FALSE, -100, 0)
=generate_link(300, 12, 25, 180, TRUE, TRUE, FALSE, FALSE, 100, 0)
These dynamic arrays feature were (I think) a recent addition to Excel, they automatically resize dependant on the results of a function. They aren’t a true array formula like days of old. But I think they are pretty neat, and make working with array outputs far easier than previous. You also don’t have to worry about overwriting something on your sheet because of the #Spill error. You can tell it’s a dynamic array because if you click within the output region a nice subtle shaded border turning up.

Anyway, back to the main point of the post, lets explain the parameters for the function. Note when entering the functions if you type in a user defined function up to the first bracket and then hit CTRL+SHIFT+A it will autocomplete the names for the parameters required: –


User defined functions operate a little different to built-in functions, you don’t get the nice tooltips like shown below explaining the variables like for built in functions. Thanks Excel…

This CTRL+SHIFT+A shortcut also works for built in Excel functions as well.
This function returns the length (in millimetres) of minimum length code compliant stirrup that is terminated with 135-degree hooks. If you need the answer in some other weird units (like imperial), then convert it afterwards.
=generate_link(bar_ctrs, stirrup_dia, enclosed_bar_dia, hook_type, vertical_link, hook_orientation, main_bars, deformed_bars, horizontal_offset, vertical_offset)| bar_ctrs | centers of the main bars (in millimeters) that the link is going around |
| stirrup_dia | bar diameter (in millimeters) used for the link |
| enclosed_bar_dia | diameter of the main bar (in millimeters) that the link is going around |
| hook_type | either 135 or 180 for a 135- or 180-degree hook |
| vertical_link | TRUE for vertically orientated link, or FALSE for horizontally orientated link |
| hook_orientation | TRUE to mirror the link (hooks mirrored in opposite direction), FALSE to accept the default orientation |
| main_bars | TRUE for the link to adopt the minimum bend diameters for main bars, FALSE to adopt the minimum bend diameters for stirrups |
| deformed_bars | TRUE for the link to adopt the minimum bend diameters for deformed bars, FALSE to adopt the minimum bend diameters for plain round bars |
| horizontal_offset | dimension (in millimeters) equating to how far you want to horizontally offset the link from the origin |
| vertical_offset | dimension (in millimeters) equating to how far you want to vertically offset the link from the origin |
generate_stirrup UDF

Similar to the links example, the coordinates for the centreline of these two stirrups are generated from the following formulas entered in cells. Two dynamic arrays are returned as shown below: –
=generate_stirrup(300, 300, 12, 32, FALSE, TRUE, FALSE, FALSE, 0, 0)
=generate_stirrup(500, 500, 6, 16, TRUE, FALSE, FALSE, FALSE, 50, -50)
=generate_stirrup(vert_bar_ctrs, horiz_bar_ctrs, stirrup_dia, enclosed_bar_dia, flip_vertically, flip_horizontally, main_bars, deformed_bars, horizontal_offset, vertical_offset)| vert_bar_ctrs | vertical centers of the main bars (in millimeters) that the stirrup is going around |
| horiz_bar_ctrs | horizontal centers of the main bars (in millimeters) that the stirrup is going around |
| stirrup_dia | bar diameter (in millimeters) used for the stirrup |
| enclosed_bar_dia | diameter of the main bar (in millimeters) that the stirrup is going around |
| flip_vertically | TRUE to mirror the stirrup vertically (changing hooks location), FALSE to accept the default orientation |
| flip_horizontally | TRUE to mirror the stirrup horizontally (changing hooks location), FALSE to accept the default orientation |
| main_bars | TRUE for the stirrup to adopt the minimum bend diameters for main bars, FALSE to adopt the minimum bend diameters for stirrups |
| deformed_bars | TRUE for the stirrup to adopt the minimum bend diameters for deformed bars, FALSE to adopt the minimum bend diameters for plain round bars |
| horizontal_offset | dimension (in millimeters) equating to how far you want to horizontally offset the stirrup from the origin |
| vertical_offset | dimension (in millimeters) equating to how far you want to vertically offset the stirrup from the origin |
generate_stirrup_set UDF
This function throws it all together to generate full rectangular stirrup sets with equally spaced stirrups. Most of the parameters are identical in one way or another to the preceding functions. A few differences are noted below: –
There are three set_type parameters that drive different arrangements as shown below, you can mix and match the types to give your desired arrangement: –


=generate_stirrup_set(set_type_vert, set_type_horiz, vert_bar_ctrs, horiz_bar_ctrs, stirrup_dia, enclosed_bar_dia, hook_type, number_legs_vert, number_legs_horiz, flip_vertically, flip_horizontally, deformed_bars, horizontal_offset, vertical_offset)| set_type_vert | type of stirrup/link arrangement for the vertical stirrup legs, select from 1, 2 or 3 as shown above |
| set_type_horiz | type of stirrup/link arrangement for the horizontal stirrup legs, select from 1, 2 or 3 as shown above |
| vert_bar_ctrs | vertical centers of the main bars (in millimeters) that the stirrup is going around |
| horiz_bar_ctrs | horizontal centers of the main bars (in millimeters) that the stirrup is going around |
| stirrup_dia | bar diameter (in millimeters) used for the stirrup |
| enclosed_bar_dia | diameter of the main bar (in millimeters) that the stirrup is going around |
| hook_type | either 135 or 180 for a 135- or 180-degree hook |
| number_legs_vert | the number of evenly spaced vertical legs |
| number_legs_horiz | the number of evenly spaced horizontal legs |
| flip_vertically | TRUE to mirror the stirrup vertically (changing hooks location), FALSE to accept the default orientation |
| flip_horizontally | TRUE to mirror the stirrup horizontally (changing hooks location), FALSE to accept the default orientation |
| deformed_bars | TRUE for the stirrup to adopt the minimum bend diameters for deformed bars, FALSE to adopt the minimum bend diameters for plain round bars |
| horizontal_offset | dimension (in millimeters) equating to how far you want to horizontally offset the stirrup from the origin |
| vertical_offset | dimension (in millimeters) equating to how far you want to vertically offset the stirrup from the origin |
Additional things to get things looking good…
Remember to set your reinforcement series in an XY scatter chart to smoothed line under formatting of the series, otherwise the linework can look a bit jagged.


To plot multiple reinforcement elements in a single chart series, remember to add a breaking row between them in Excel and set the appropriate method for not plotting any gaps, otherwise you’ll end up with a mess as beginning and end points of each individual stirrup or link are connected via linework: –

To avoid this in the function for generating a stirrup set, a #NA error is purposely inserted between each individual elements coordinates so these unwanted lines/points don’t plot (provided you have the following settings under Select Data->Hidden and Empty Cells set appropriately)

You can also set the plot ranges to dynamically expand to the available data size by using the approach outlined here. This is pretty useful, so you don’t have to manually resize the range being referenced by a series. If you have a situation where you could be plotting 2 stirrups one day and 100 the next on the same chart, then you want to look into doing this to avoid only plotting a part of your data.
Some final words…
I have these functions in an add-in, so they are available to all my spreadsheets. However, if sharing a spreadsheet, you’re probably best to put the code in a module within the spreadsheet.
You should be able to modify the code quite easily if required to your own local code requirements by changing the values for bend diameters, hook extensions and so forth (or write similar modules to plug in your own values).
Otherwise use it ‘as is’ to give you a picture that looks ‘about right’ to impress the sheep in your life.
You can find the functions on my GitHub page right here, just import the Reinforcement_functions.bas file in the VBA Editor and you’re good to go.
I’ve got one more part in this series up my sleeve to go through the stirrup/link length functions and to explain how I go about representing main reinforcement bars on charts and some tips and code for maintaining a chart so the X and Y axes are in scale. For example, as a little teaser: –

I’ll add more functions as time, need and inspiration arises! Enjoy.
Cool, I love VBA for Excel, it has so many uses.
Rosangela Rodriguez has a very good LinkedIn post on how she uses VBA to automate drawing in AutoCAD. You should check it out here:
https://www.linkedin.com/posts/rosangelakarina_automation-codinglife-autocad-ugcPost-6590835360195063808-Q2PV
She also has a blog and some sample code.
https://discoverthevalueof.wixsite.com/blog/post/ae2-inserting-autocad-objects-from-vba
Well done! Thanks for sharing – it’s fun to follow along and learn different approaches (both in python and excel/vba). I don’t have the latest dynamic arrays feature for my version of excel, but the control shift enter approach worked fine. Look forward to your next post
If you change to the monthly channel you should get the dynamic arrays and other recent stuff (like the xlookup function). Just have a search in Google and you’ll find some links on how to change the update channel you’re on.
Very well explained! Thanks a lot!